Step-by-step Guide
Step 1: Choose a Sign-In Option
To get started, head to the Inflectiv Alpha Platform and sign in to access your data management dashboard.
Available Sign-in Options:
You have two secure methods to access the platform:
🔹 Continue with Google
A one-click sign-in method using your Google account.
Recommended for users who want a fast, familiar login method.
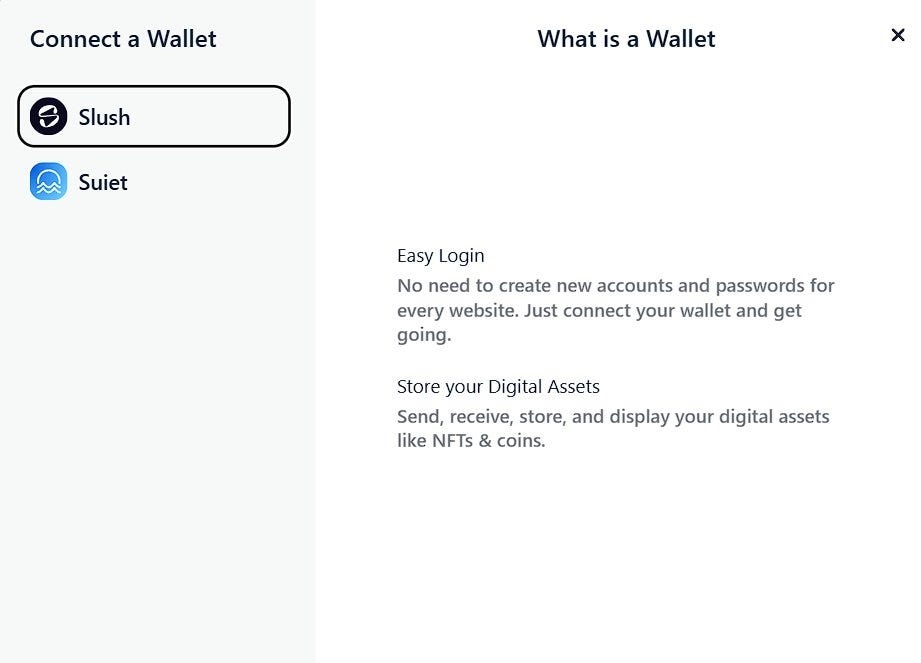
🔹 Connect Wallet
Sign in using a supported Sui-compatible wallet.
This method is ideal for users who want full access to Web3 features like staking, tokenization, and decentralized dataset interactions.
Supported Wallets:
If you choose the wallet method, you’ll see a list of supported wallets:
Slush — Official Sui wallet (formerly Sui Wallet)
Suit — A popular Sui wallet
Martian — A multi-chain wallet
Each wallet listed provides a direct link or installation prompt. Once connected, your wallet will serve as your verified identity across the platform.
Secure Authentication:
Inflectiv uses enterprise-grade security protocols to protect your data and identity. All new users will be automatically registered upon their first sign-in.
Step 2: Create a Dataset
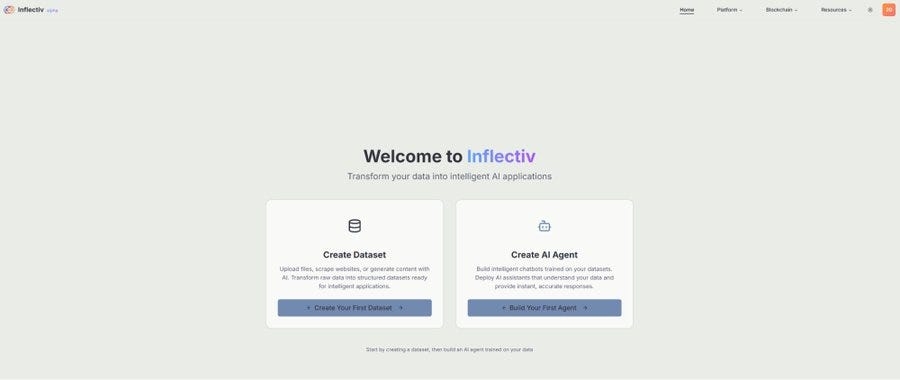
Once you’re logged in, you’ll be directed to the main dashboard — your central control hub for managing datasets, building chatbots, creating automations, and participating in staking.
Key Sections of the Dashboard:
Datasets
This is where your AI journey begins.
Click Create Dataset to start a new dataset using files, websites, or AI-generated content.
Click See My Datasets to view, edit, or manage previously created datasets.
AI Chatbots
Deploy intelligent assistants trained on your datasets. Click Build Chatbot to launch a new assistant.
Use See My Chatbots to manage existing chatbots.
Step 3: Create a Dataset

After clicking the Create Dataset button on the dashboard, you will be taken to the dataset creation screen. This is where the real structuring of your knowledge begins.
Dataset Workspace (Left Panel)
Untitled: This is the placeholder name for your dataset. You can rename it later to something relevant to the data you are working with.
Description: Add a brief summary that describes the dataset’s purpose or contents.
Resources: This panel shows the assets (files, URLs, or Drive links) you’ve added. You can upload documents, paste links, or connect your Google Drive for cloud access.
Formats supported include PDF, CSV, DOC, and web links.
Choose a Dataset Creation Method (Right Panel)
Under “How do you want to create your dataset?”, you’re presented with four streamlined options. These options are modular, and you can later refine or combine them:
🔹 Use Your Data
Upload your own data files such as PDFs, DOCs, CSVs, or TXT files.
The system will structure and enrich them automatically.
Perfect for uploading research reports, technical documents, whitepapers, etc.
🔹 Use the Web
Add a URL (e.g., a blog post, GitBook, or Wikipedia entry).
The system extracts and formats the content into a dataset.
Great for gathering live data or transforming existing web content into structured knowledge.
🔹 Blend All Sources
Combine AI, documents, and web sources into one comprehensive dataset.
Useful when you want to synthesize multiple data types or perspectives into a single structured asset.
Most powerful and flexible option for hybrid datasets.
Tip: You can always switch between methods or refine settings later. This setup is designed to give you a flexible and composable starting point for structuring AI-ready knowledge!
Step 4: Add Resources and Generate Your Dataset

Once you’ve selected your dataset creation method, you’ll land on the Resource Blending Interface, where you can combine multiple data types into one structured, AI-ready dataset.
Quick Actions
You can now mix and match different types of sources:
🔹 Upload Files
Click Upload Files to add documents from your local machine.
Supported formats: PDF, DOCX, TXT, CSV.
These will be parsed and enriched automatically for AI processing.
🔹 Add Website
Enter a URL (e.g., blog, GitBook, article) in the field provided.
Click Add to extract structured data from the webpage.
This is useful for gathering live or public domain content.
Once you’re satisfied with the combined sources…
Get Inflectiv Publisher’s stories in your inbox
Join Medium for free to get updates from this writer.
Subscribe
Click “Generate Blended Dataset”
This step will process all selected inputs into a cohesive, structured dataset.
After generation, you’ll be redirected to the Data Management, where you can preview and manage your dataset.
Step 5: Create a Chatbot

Inflectiv allows you to create intelligent AI chatbots that are powered by your structured datasets. These chatbots can assist users, answer queries, and provide real-time insights based on your data.
How to Create a Chatbot
To start building your own chatbot:
Navigate to the AI Chatbots section.
Click the “Build Chatbot” button to open the chatbot creation form.
Fill Out the Chatbot Form
Field
Description
Title (required)
Give your chatbot a clear and recognizable name.
Example: “Product Assistant”
Slug (auto-filled)
This becomes part of the chatbot’s URL (you can edit it).
Example: product-assistant
Chatbot Image (optional)
Upload a custom avatar or icon (max 5MB).
Supported formats: JPG, PNG, GIF.
Description (optional)
Add a brief description of your chatbot’s purpose or behavior.
Dataset (required)
Select a dataset that powers the chatbot. This will define what the chatbot “knows.”
Type
Choose how the chatbot will be deployed:
• WEB for embedding on websites
• TELEGRAM, DISCORD, etc. (more types coming soon)
Status
Choose whether the bot is immediately available to use:
• PUBLISHED: Visible and ready for use
• UNPUBLISHED: Hidden until manually published
Finalize
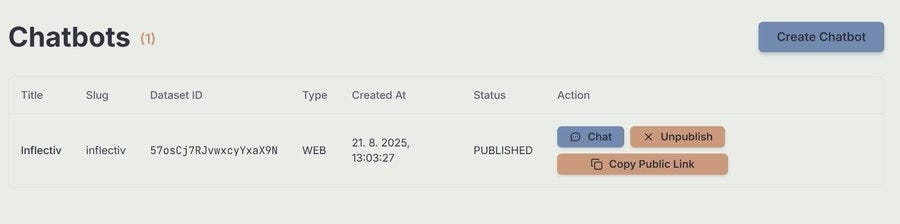
Click Create to deploy your chatbot.
If successful, it will appear in your Chatbots dashboard and can be edited or managed at any time.
Step 6: Chat with Your Chatbot

Once your chatbot is created and published, you can immediately begin interacting with it through the web chat interface.
Chatbot Title & Info: At the top, you’ll see your chatbot’s name, associated dataset, creation time, and current status. Chat Interface: Below that, you’ll find a live, interactive chat window where you can test and use your AI assistant.
How to Use It:
1. Send Messages Use the chat box at the bottom to type questions or commands. Press Send to submit.
2. Quick Prompts Try the pre-suggested buttons like:
“Hello!”
“What can you help me with?”
“Tell me about yourself”
“How does this work?”
3. Online Status A green dot and Online indicator confirm that the bot is active and ready to respond.
Tips:
Your chatbot pulls knowledge directly from the dataset you connected it to, the better the dataset, the better the responses.
You can return to the Chatbots panel anytime to update, unpublish, or delete your bot.
Use this interface to test your bot’s knowledge, logic, or tone before deploying it more widely (e.g., embedding on your site).
Step 7: Update Your Profile

Managing your Inflectiv profile ensures a personalized and secure experience across the platform.
Profile Image
Click the default avatar or the Upload Image button.
Supported formats: JPG, PNG, GIF
Maximum file size: 5MB A unique image helps distinguish your account, especially when collaborating or sharing datasets.
Display Name
Enter a name to display across the platform.
This will appear on shared datasets, chatbots, and community interactions.
Your email address is displayed here.
Note: Email cannot be changed once the account is created.
After entering your details, click Update Profile to save your changes. You can always return to the Dashboard using the Back to Dashboard button at the top.
Last updated